
Tuesday, October 5, 2010
Empty out that junk drawer!
Sunday, October 3, 2010
I see London, I see France
This Pumpkin-butt needs some underpants!


This seriously made me laugh for about an hour. Thanks to Fringe Girl for the giggles!
Friday, October 1, 2010
I may wear these all October!

But THESE made me drool. I'm a sucker for candy necklaces. And I love those pumpkin mallows that come out every Halloween. The combination? Scuze me while I wipe my chin! Wouldn't they be uber-cute with candy corns in between instead of ribbon? My only problem now is figuring out how not to eat them as soon as I put them on!
Saturday, September 25, 2010
Gorgeous!

Doesn't this make you want to go jump into a pile of fall leaves?
Go check out Donna Lynn's other beauties at Blushing Rose Antiques.
Thursday, September 23, 2010
I spy my new kitchen light!
Adventures in Crafting just saved my sanity by posting a reminder of how awesome wine bottle lights can be.

While I LOVED (and totally used) her tutorial for the wiring process, stay tuned for a tutorial on how I cut the bottles...it doesn't involve power tools!

Can't you just picture these over my kitchen sink?
While I LOVED (and totally used) her tutorial for the wiring process, stay tuned for a tutorial on how I cut the bottles...it doesn't involve power tools!
Tuesday, September 21, 2010
Oh yum.
You know how amazing homemade bread is, right? If not, you're missing out.
And you know how good homemade pizza is if you've tried the easy dough from my last post, right?
Over at The Ivory Hut they have invented a marvelously wonderful hybrid called Crazy Pizza Bread. You must go and make it. Now. Do not pass GO. But if you find $200 lying around, I could use some!
PS- if on the off chance you have any leftovers, it really does freeze beautifully!
Sunday, September 19, 2010
Holy Custom Cookery!

+

Saturday, September 18, 2010
That dreaded 7am Saturday meeting just got easier
Thanks to the cool folks over at Picky Palate! They posted these ah-maze-ing looking faux-bacon-egg-and-cheese McMuffins that I can't wait to try. My crustless mini-quiches have been quite popular the last few meetings, but these just might win over the last hold outs. I simultaneously can't wait to try them but can't believe I really have to get up for this meeting again. Check the recipe out over at Picky Palate. I'd love to hear of them being baked up for good use at normal brunch times! It might make me feel better as I drag myself from bed in the dark next week!
I'll make a few extra and see how the hold in the fridge and freezer. If they hold up to storage, wouldn't they be genius on those crazed mornings? Just grab, nuke and go!
I'll make a few extra and see how the hold in the fridge and freezer. If they hold up to storage, wouldn't they be genius on those crazed mornings? Just grab, nuke and go!
Friday, September 17, 2010
Cool hidden storage DIY
Can you find the storage here?

Hint: some of these books are not like the others. Which of these books just doesn't belong?
Now that I've dated myself completely with the old school Seasame Street reference, check out these cool repurposed boxes turned storage books! You can find the whole how to at Design Sponge.

Don't you just want a shelf full of these? I know I do...now to find enough boxes to remake!
Wednesday, September 15, 2010
Great small space option for kids with lots of energy!

Monday, September 13, 2010
Happy Anniversary Mom and Dad!
Forty-two years ago, after dating for six months, my parents married in a San Francisco courtroom on Friday, September the 13th. Yes, really. I'm not making this up! You can imagine we didn't put much faith in old superstitions at our house growing up. Mom has always said she had to say yes if she ever wanted to see her belongings again...they were already on a truck being moved to Alabama where my Dad had been transferred. He proposed so Bechtel would move her stuff, too! Thanks for showing me that marriage means getting up every morning and deciding to make it work. You've always shown me that marriage is like anything else in life...hard work, well rewarded.
Happy Anniversary! I love you both.
Happy Anniversary! I love you both.
Saturday, September 11, 2010
Champagne Cage Chairs
Over at Design Sponge, I stumbled across this cool post on how to turn the wire cage that holds the corks in champagne bottles into a cute little chair with just a snip and a few twists. How incredibly cute would these be with a seating direction card slipped into them for a wedding or another big affair? I almost wish I'd seen these before my wedding, though my straw labels were awfully cute too! I think these would be easier for guests to see, though. And since they're chairs, self-explanatory. :)
 See? Just slide the card behind the little loop and off they go! Bonus, they're free! Double bonus, they're an excuse to drink champagne! (As if I ever need one!) Check out the instructions here at Design Sponge.

Thursday, September 9, 2010
Now if only I had enough space to grow pumpkins next year...

Yep, you're seeing that right. That pumkpin grew the word "Welcome" on it's skin! You know how sometimes when you buy pumpkins, they have those thick brown scaly calloused areas? Over at Not Just a Housewife, the cleverest lady on earth realized that we can manipulate those scars to form whatever pumpkin art we want! By scratching the desired design onto the pumpkin's skin just as it turns orange, it scars over and makes cool words! It can make pictures, too, of course. Whatever you want to scratch in! Thanks to her I just might finally win the yearly 'coolest pumpkin contest' with my sister-in-law next year!
How neat would it be if every family on your block had one with "the Whoever's" on their porch for the autumn season? Now if only I had enough space for a garden to grow them all! Oh, well. I have a year. I'm sure I can con beg someone to loan me some a ton of garden space. I don't think I could stop with just one of these!
Tuesday, September 7, 2010
Homemade fruit rollups
Okay, I grew up begging for fruit roll-ups and very rarely getting them because they were so full of sugar. As an adult, I indulged until I discovered they're mostly full of corn syrup...something I can't tolerate. Literally, it makes me ill! So I've been exploring the idea of making my own from excess fruit laying around. Having found these homemade polka-dot ones over at Fix Me A Snack means I might just be borrowing a dehydrator in the near future! I wonder how low my oven temp goes....?
In the meantime, enjoy the eye candy!
In the meantime, enjoy the eye candy!
Sunday, September 5, 2010
Thank heavens it's September!
Unlike most of the world, September is a breath of calm in my world. After two months of crazy sales at my job, things return to their normal level of insanity every September! Which means I can go back to my kitchen, my sewing machine and all those other great blog ideas I've missed in the last two months. Sigh It's good to be back!
Sunday, August 1, 2010
EEEP, a FOURTH chance!
Amy over at The Idea Room is giving away a Silhoutte cutter! And I want one sooooooooooo badly I can taste it! Those big glass jars of flour and sugar don't stand a chance if I win this one...
Anyway, I'm gonna go enter whilst I wipe the drool off my chin. Fingers, toes, arms, legs and any other part I can manage crossed that I might be the lucky winner this time!!!
Anyway, I'm gonna go enter whilst I wipe the drool off my chin. Fingers, toes, arms, legs and any other part I can manage crossed that I might be the lucky winner this time!!!
Saturday, July 31, 2010
LOVE THIS DRESS...
WOW!

I wish I had found this inspiration about 3 years ago before I got married. I inherited lots of handmade lace doilies from my Grandma Hoochie (no, she wasn't a stripper. Somehow, that's the way her name Ruth was pronounced in Brazil in the 70's. Or so I'm told!). Wouldn't that have been wonderful to walk down the aisle in my Grandma's handmade lace? Especially since she's not here with us anymore. But absolutely gorgeous...and handmade by the bride in less than 3 weeks! Complete wonderwoman! Wish I could direct you to the site, but it was a daily feature on a bridal site...if anyone knows where to link to this amazing dress, do tell!

I wish I had found this inspiration about 3 years ago before I got married. I inherited lots of handmade lace doilies from my Grandma Hoochie (no, she wasn't a stripper. Somehow, that's the way her name Ruth was pronounced in Brazil in the 70's. Or so I'm told!). Wouldn't that have been wonderful to walk down the aisle in my Grandma's handmade lace? Especially since she's not here with us anymore. But absolutely gorgeous...and handmade by the bride in less than 3 weeks! Complete wonderwoman! Wish I could direct you to the site, but it was a daily feature on a bridal site...if anyone knows where to link to this amazing dress, do tell!
Monday, July 19, 2010
No I haven't vanished...
I spent all last week frantically working toward my husband's birthday present...finishing the remodel we started last OCTOBER! I am proud to announce that with the exception of 1 wall in a non-necessary room, it's finally done! Of course, then we had to throw him a birthday party to show off the new kitchen, so that ate up my weekend... And then I pinched a nerve in my back, missed a day of work and had a lovely cortisone injection. So I've been a little busy lately!
Stay tuned for a step by step update on how we built new walls, knocked holes in other and installed a new kitchen...mostly by ourselves! Heck, mostly by MYself! :)
Stay tuned for a step by step update on how we built new walls, knocked holes in other and installed a new kitchen...mostly by ourselves! Heck, mostly by MYself! :)
Saturday, July 10, 2010
Chicken Basics: Thai Coconut Curry Soup
First, let me say this: I don't like coconut. However, I do like coconut milk in this soup. Without it's presence, this is a spicy monster of a soup. So don't discount this recipe just because of it's name. It's really good, especially when you come home with a cold in the winter...or in my case, the middle of summer!
Thai Coconut Curry Soup
Ingredients:

Thai Coconut Curry Soup
Ingredients:
- Leftover chicken and rice, from Chicken Basics recipe
- 1 1/2 cups or 1 can chicken broth
- 1/3 can cocanut milk or cream (cream is thicker, milk has less fat. You pick your fav!)
- One large or two small sliced carrots, cut into small pieces
- 2 tsp garlic
- 1 tsp garlic-pepper sauce (found in the Asian section of the market)
- 1/2 cup sliced red, orange or yellow peppers
- Either 1 tbsp fish sauce or 1 tsp soy sauce (fish sauce lends a better taste to the overall soup)
- Lime juice
- Frozen cilantro cube or 1 tbsp chopped fresh cilantro

- In a saucepan, mix together chicken broth, garlic, garlic-pepper sauce and fish or soy sauce. Set to boiling on stovetop. Add enough garlic-pepper sauce that the broth is just too spicy to tolerate. The coconut milk will tone it down considerably in step five.
- Clean and chop carrots; add to pot.
- Chop chicken breast and add to pot.
- Mix in the leftover brown rice.
- Add in the cilantro cube, coconut milk/cream and sliced red peppers.
- Stir to combine. Taste broth at this point to check for spice level. If it's too hot for you, add a bit more cocanut milk, chicken broth or rice to take the heat off.
- Just before serving, add a squirt of lime juice and Sriacha hot sauce (if you like it REALLY spicy--like I do!)
- Eat!


This soup cures sinus congestion better than any medication I've ever tried. And with all the carrots, peppers and garlic, it's a nice dose of vitamins too! We eat this several times a month every winter, just for the warming properties the spices give it. Yum.
Friday, July 9, 2010
Homemade Hair Conditioner....I bet it's in your kitchen now!
I have fine, straight, thin hair. It doesn't do much, won't hold a curl to save its life and TANGLES. I've had tangles the size of my fist, I kid you not. They just appear, overnight. When I was five, they got so bad despite daily brushing that my Mom cropped my hair into a boy's cut. All the conditioner in the world didn't help them and always left the rest of my hair looking limp and greasy. Since my hair tends toward greasy anyway, the extra conditioner needed to prevent the tangles made it really awful!
So when I finally decided to give up shampoo and switched to a gentle castille based soap for hair and body, I was seriously worried about the tangles I was setting myself up for. Surprisingly, the monstrous knots didn't get much worse. But they also didn't get any better...and I was SO sick of ripping my hair to shreds every day just to leave the house looking presentable! Then, whilst reading up on the no-poo method of hair washing someone suggested using a vinegar rinse to balance the hair's pH level. Well, ok. I have vinegar...let's try it! Added some vinegar to an old shampoo bottle, topped it off with water and squirted it over my hair in the shower one night. Wasn't too keen on the vinegar smell that wafted from my hair until it dried, but decided to reserve judgement until the next morning once it had dried and I could comb the tangles out...except for the first time I can remember (having hair longer than three inches in length), there weren't any tangles to comb out! I couldn't believe it! I was so thankful I'd found something that worked and didn't leave my hair greasy, I just wished it didn't smell like vinegar! Coming out of the bathroom smelling like salad dressing was not my idea of a relaxing shower experience. Fortunately, help was at hand over at One Green Generation! She mentioned that she'd switched from apple cider vinegar to white vinegar with a vanilla bean pod in it for a prettier smell. DingDingDing-we have a winner! I started several different jars of vinegar with assorted flavorings to see what worked...and thus far, they ALL did! So I present to you my choice for smoooth and silky hair, naturally!
No-tangle, Shiny Hair Rinse
Ingredients:
- 1/2 cup white vinegar
- 2 cups water
- Flavorings: cinnamon sticks, orange or lemon peel (just the colored zest from the peel-no white stuff!), mint leaves, vanilla bean pod, I've heard rosemary springs are nice, too!
- Add mint leaves, cinnamon sticks, lemon peel, vanilla bean pod, whatever-you're-trying to bottle.I've used leftover jelly jars, Tupperware, bottles with a cork...anything with a lid on it!
- Pour 1/2 cup (or more) vinegar into the container, add the lid and shake once or twice.
- Set it somewhere dark-ish where you're bound to see it once or twice a day. I used my snack cupboard. At least once a day for a week, shake or swirl the bottle/jar of vinegar and flavorings.
- Decant the vinegar out on day seven, pour into an old shampoo or squirt bottle and add 2 cups water.
- Use in shower like a conditioner. Apply, let sit a minute and rinse out for sleek and shiny hair!
Friday, July 2, 2010
Today
Today was hard. Work was spent playing catch up from what didn't get done last night while customers yelled. :( And then we got word that the courts have agreed with Schwarzenegger that state workers can be reduced to minimum wage until the budget crisis is resolved. So my husband's paycheck just got shorted 70%. Add in I'm still working short work hours on doctor's orders, and our financial life just got real hard, real fast.
sigh
So now I can worry and stress and fuss about how we'll make ends meet next month when our combined income is less than our mortgage payment OR I can make tutus. Samster Mommy is running a tutu drive for the Princess Alexa Foundation that gives dress up clothes to hospitals and critically ill children. Yes, I'm not 100% healthy yet. Yes, our financial picture is scary right now. But these are temporary issues that will resolve themselves, leaving us still standing. The issues these parents and kids are facing may not. And let's face it, right now make believe is right up my alley! (cause reality isn't so fun today) So I'm going to go make believe a few tutus into reality to send off tomorrow. Which means tomorrow already has one happy, glowy moment in it so it has to be better than today!
Wednesday, June 30, 2010
More lead...this time in FOOD!
It's appalling. And scary. I mean, lead in kids toys isn't good, but doesn't shock me. They're cheap, coming from China and not meant to be eaten. But high lead levels in APPLE JUICE? And not just off-brand apple juice: Whole Foods, Trader Joes, even GERBER! Check out the full article here at inhabitots. Big thanks to SamsterMommy for reprinting the list. I'd missed this entirely. There is no safe level of lead to ingest. Please go check your cupboards for the following: All 125 of them!
LEAD-TAINTED PRODUCTS:
1. 365 Everyday Value Organic 100% Juice Concord Grapes
2. Beech Nut 100% Apple Juice
3. Best Yet Bartlett Pear Halves in Heavy Syrup
4. Best Yet Chunky Mixed Fruit in Pear Juice
5. Best Yet Yellow Cling Peach Halves in Heavy Syrup
6. Chef’s Review Fruit Cocktail
7. Del Monte 100% Juice Fruit Cocktail
8. Del Monte Chunky Mixed Fruit in 100% Juice (peach, pear, grape, etc.)
9. Del Monte Diced Pears in Light Syrup
10. Del Monte Freestone Peach Slices in 100% Juice
11. Del Monte Fruit Cocktail in Heavy Syrup (peach, pear, grapes)
12. Del Monte Fruit Cocktail No Sugar Added
13. Del Monte Lite Fruit Cocktail in Extra Light Syrup
14. Del Monte Pear Halves in Heavy Syrup
15. Del Monte Pear Halves, Bartlett Pears in 100% real fruit juice from concentrate
16. Del Monte Sliced Yellow Cling Peaches in 100% Juice
17. Del Monte Sliced Yellow Cling Peaches in heavy syrup
18. Dole Diced Peaches, Yellow Cling in light syrup
19. Dole Mixed Fruit in Light Syrup
20. Dole Pear Halves in Juice
21. Earth’s Best Organics Apple Juice
22. Eating Right Fruit Cocktail packed in Sucralose
23. Eating Right No Sugar Fruit Cocktail
24. First Street 100% Apple Cider from concentrate
25. First Street Apple Juice from concentrate 100% juice
26. First Street Diced Pears
27. First Street Fruit Cocktail in heavy syrup
28. First Street Grape Juice from concentrate 100% juice
29. First Street Sliced Bartlett
30. First Street Yellow Cling Peaches in heavy syrup
31. Full Circle Organic Apple Juice
32. Full Circle Organic Bartlett Pear Slices
33. Gerber 100% Juice – White Grape Juice
34. Gerber 100% Juice Apple Juice
35. Gerber 3rd Foods Peaches
36. Gerber 3rd Foods Pears
37. Golden Star Mixed Fruit in Light Syrup (peach, pineapple, pears)
38. Golden Star Peach Halves in Heavy Syrup
39. Great Value 100% Grape Juice
40. Great Value 100% No Sugar Added Apple Juice
41. Great Value Bartlett Pear Halves in 100% Juice
42. Great Value Bartlett Sliced Pears in Heavy Syrup
43. Great Value No Sugar Added Fruit Cocktail
44. Great Value Yellow Cling Sliced Peaches
45. Hansen’s Natural Apple Juice
46. Kedem Concord Grape Juice 100% pure grape juice
47. Kroger 100% Juice Apple Juice
48. Kroger Fruit Cocktail in Heavy Syrup
49. Kroger Grape Juice 100% Juice
50. Kroger Lite Fruit Cocktail in Pear Juice
51. Kroger Value Fruit Mix (Peaches, pears, grapes)
52. Langers Apple Juice 100% Juice
53. Langers Grape Juice (Concord)
54. Langers Red Grape Juice
55. Libby’s Fruit Cocktail No Sugar Added (Sweetened with Splenda)
56. Libby’s Yellow Cling Peach Slices No Sugar Added (Sweetened with Splenda)
57. Market Pantry Diced Peaches in light syrup
58. Market Pantry Diced Pears in light syrup
59. Market Pantry Mixed Fruit in light syrup
60. Maxx Value Fruit Mix in Light Syrup (peach, pear, grape)
61. Maxx Value Pear Pieces in Light Syrup
62. Minute Maid Juice Apple – 100% Apple Juice
63. Motts 100% Apple Juice
64. Mrs. Brown’s Fruit Cocktail in Heavy Syrup (peaches, pears, grapes)
65. O Organics Organic Grape Juice from concentrate
66. O Organics Organic Unfiltered Apple Juice Not From Concentrate
67. Old Orchard 100% Apple Juice
68. Parade 100% Juice Apple
69. Polar Mixed Fruit
70. Polar Peach Slices
71. Polar Pear Halves in light syrup
72. R.W. Knudsen Just Concord Grape Juice
73. R.W. Knudsen Organic Just Concord
74. Raley’s 100% Grape Juice
75. Raley’s Fruit Cocktail in Heavy Syrup
76. Raley’s Premium 100% Apple Juice not from Concentrate
77. Raley’s Sliced Yellow Cling Peaches in Heavy Syrup
78. S&W Natural Style Fruit Cocktail in Lightly Sweetened Juice
79. S&W Natural Style Pear Slices in Juice
80. S&W Natural Style Yellow Cling Peach Slices in Lightly Sweetened Juice
81. S&W Premium Peach Halves Yellow Cling Peaches in light syrup
82. S&W Sun Pears Premium
83. Safeway 100% Juice Apple Cider
84. Safeway 100% Juice Apple Juice
85. Safeway 100% Juice Grape Juice
86. Safeway Diced Peaches in Light Syrup
87. Safeway Fruit Cocktail in Heavy Syrup
88. Safeway Light Sugar Fruit Cocktail
89. Safeway Lite Bartlett Pear Halves in Pear Juice
90. Safeway Lite Fruit Cocktail in Pear Juice
91. Safeway Organic Grape Juice
92. Safeway Pear Halves in Light Juice
93. Safeway Yellow Cling Peach Slices in Pear Juice
94. Santa Cruz Organic Concord Grape Juice
95. Simple Value Yellow Cling Peaches in light syrup
96. Stater Bros. 100% Juice Apple Juice
97. Stater Bros. 100% Juice Grape Juice
98. Stater Bros. 100% Juice White Grape Juice
99. Stater Bros. Fruit Cocktail in Heavy Syrup
100. Stater Bros. Yellow Cling Peach Halves
101. Stater Bros. Yellow Cling Sliced Peaches in heavy syrup
102. Sunny Select 100% Apple Juice
103. Sunny Select 100% Grape Juice
104. Sunny Select Fruit Cocktail in Juice
105. Sunny Select Pear Halves in Pear Juice
106. Sunny Select Yellow Cling Sliced Peaches in Pear Juice
107. Trader Joe’s Certified Organic Apple Juice, pasteurized
108. Trader Joe’s Concord Grape Juice made from fress pressed organic concord grapes
109. Trader Joe’s Pear Halves in white grape juice
110. Trader Joe’s Yellow Cling Peach Halves in while grape juice
111. Tree Top 100% Juice Apple Cider
112. Tree Top 100% Juice, Grape
113. Truitt Brothers Pacific NorthWest Bartlett Pear Halves, in pear juice from concentrate
114. Valu Time Grape Drink from Concentrate
115. Valu Time Irregular Bartlett Pear Slices
116. Valu Time Yellow Cling Peach Slices
117. Walgreens Apple Juice from concentrate 100% juice
118. Walgreens Grape Juice from concentrate 100% juice
119. Walnut Acres Organic Concord Grape
120. Walnut Grove Market 100% Apple Juice
121. Walnut Grove Market Grape Juice
122. Walnut Grove Market Natural Peaches Sliced Yellow Cling in Light Syrup
123. Walnut Grove Market Natural Pear Halves in Heavy Syrup
124. Welch’s 100% Grape Juice (from Welch’s Concord Grapes)
125. Welch’s 100% Red Grape Juice from Concentrate
Monday, June 28, 2010
Third times the charm?
Yup, I found one more blog giveway for this Silhouette cutter I so want. Imagine the vinyl, the t-shirts, the pyrex, oh I'd be busy for weeks!
If you would be, too, jump over to Just a Girl to see all the neato ideas she's come up with for her free cutter!
If you would be, too, jump over to Just a Girl to see all the neato ideas she's come up with for her free cutter!
Saturday, June 26, 2010
Vanilla Almond Granola
I have a love/hate relationship with granola. Most store bought boxed versions are too high in sugar and low in protein to really mesh well with me. I end up hyper and then crashing from the sugar rush it gives me, so I've experimented with making my own. I think I finally hit on the right mix, and then someone requested I share it...which meant I had to go figure out what I'm actually doing when tossing the ingredients together! I think I got it right with these measurements, so this is for you, Shannon!
Vanilla Almond Granola
Ingredients:
This one ended up closest to the batch I like so well! And I want to try out blueberry granola and her baking tips for getting a softer, chewier version next!
Vanilla Almond Granola
Ingredients:
- 2 cups old fashioned oats
- 1 cup sliced or slivered almonds
- 1/4 cup sunflower or other oil
- 1/4 cup honey
- 1/4 cup brown sugar
- 2 tablespoons cinnamon
- 1 tablespoon vanilla
- In a glass measuring cup, mix: oil, honey and vanilla.
- Stir well to incorporate the mixture
- Pour oats into a large bowl.
- Drizzle liquid over oats, stirring to coat completely. For a stickier, clumpier granola let this mixture sit about 30 minutes. For a drier, sprinklier granola, proceed to step 5 immediately. (this is what I do...because I'm impatient)
- Stir almonds into coated oat mixture.
- Add cinnamon and stir WELL.
- Add brown sugar and stir again.
- Spread evenly onto cookie sheet. For clumpier granola, squeeze some areas into balls by gripping in your hands. (I don't bother with this)
- Bake until brown, stirring at least twice. The official process calls for slow baking at 250 degrees for an hour and a half. My method, as an impatient and sloppy chef, is to use the heat from something else I've cooked to brown the granola. When I pull out whatever else I've been cooking and turn off the oven, I toss the granola in and let it sit for 1-2 hours until brown and toasty. This takes less electricity (which makes the granola cost SO much less), leaves the house smelling yummy and has less chance of burning when I forget it's in the oven. This is often. C'mon, we're talking about me here!
- When toasted, store in plastic bag, glass jar, etc. Enjoy over yogurt or with milk.
This one ended up closest to the batch I like so well! And I want to try out blueberry granola and her baking tips for getting a softer, chewier version next!
Friday, June 25, 2010
Still dreaming in Silhouettes...
I found ANOTHER giveway for that dreamy Silhouette Cutter that we all want so desperately! So dash over there and enter it here at Southern Hospitality. Then check out the rest of their neat ideas...before dreaming about that Silhouette machine again, of course!
Thursday, June 24, 2010
I WANT IT!!!
Ok, so most of you were expecting easy yumminess in the way of the Oriental Stir Fry I promised. Silly you. I've been sidetracked by the gimmies. Namely, THIS giveaway at my fave ThriftyDecorChick.blogspot.com.
She's giving away the most awesome vinyl/paper cutter AND I WANT IT! Please random number generator, pick me!! LOL
But seriously, I read her blog every day. Check her out, you won't be sorry. Except for the whole you-loose-track-of-six-hours-and-it's-5am thing that happens to me every time!
She's giving away the most awesome vinyl/paper cutter AND I WANT IT! Please random number generator, pick me!! LOL
But seriously, I read her blog every day. Check her out, you won't be sorry. Except for the whole you-loose-track-of-six-hours-and-it's-5am thing that happens to me every time!
Tuesday, June 22, 2010
Chicken Basics: Chicken Burritos
This recipe can be made with either re-fried or black beans. I prefer the re-fried beans that come with green chilies in them, but often find the black beans are quicker to deal with (less sticky, you know?). Either way, this is a yummy quick and easy recipe that makes TWO good sized burritos! So eat a salad on the side and take the other for lunch tomorrow. (Hey, that's two meals for one! It doesn't get better than that!)
Chicken Burritos Recipe
Ingredients:

Chicken Burritos Recipe
Ingredients:
- Leftover chicken and rice, from Chicken Basics recipe
- 1/4 can or 1/3 cup either black or re-fried beans
- two 10" tortillas (these freeze well, if you can't get through a bag before they go bad)
- 2-4 tbsp of favorite salsa
- 1/4 cup of shredded cheese (Mexican blend or cheddar work best)
- Chopped lettuce for salad (I like romaine)
- Open your chosen beans and warm 1/4 can or 1/3 cup. If using black, mix with rice. For re-fried, spread down the middle of the tortilla.
- Dice chicken breast.
- Mix diced chicken, rice, salsa, cheese in a bowl and microwave until the cheese is melted. Stir filling to combine.
- Spread filling onto tortillas and top with your favorite burrito fillings. (think olives, avocado, guacamole, mmmm)
- Add salad to plate and eat!


See my post on how to fold a burrito here, if it's confusing!

I stopped washing my face...
No really! I haven't given into the grime and let the sloth in me take over. I just stopped washing my face.
I have oily skin on my nose and chin that's dry on my cheeks and forehead. Trying to find a face wash that balanced all that, while still being a natural product was killing me and my bank account. Until I stumbled across a blog posting about something called The Oil Cleansing Method over at Simple Mom. Check it out here. Basically, you rub a mixture of olive and Castor oil on your face, steam with a hot washcloth, then wipe the gunk off. I didn't really know how this would work but I had all the ingredients in my cupboard already so it was at least a cheap option to try! Besides, a face massage followed by a steam sure sounded better than drenching myself and the bathroom with water to wash my face every night! I know from my BS-in-Chemistry holding Grandma that oil dissolves oil so I figured it might just work to use olive oil to dissolve the nasty oil on my face, right? I was still shocked when it did.
The very first week I tried this with a safe mixture of 70% olive oil and 30%Castor oil, I hit the holy grail people online had been talking about. While I was massaging the oil into my skin, I started feeling little grainy things on the surface of my skin. Never one to wonder, I scraped one onto the tip of my finger and headed for the magnifying glass to determine what it was. Lo and behold: it was a blackhead. Dark at the tip, tapered to a point, ew factor to the extreme. But it was no longer in my face! Woo-hooo! This crazy idea really works! And it left skin feeling moisturized but not greasy...something commercial moisturizers have never achieved.
Since then, I've refined my method to best fit my skin. This process does take some experimenting to get the best results. But you're experimenting with different mixtures of the stuff you already have, so the price doesn't go up! Yay for that! I now use the same original oil mixture all over my skin, but add a drop of pure Castor oil to my nose and chin for further cleansing of the stubborn black heads. I love feeling the plugs fall out as I massage every night. You know how we all secretly like popping zits? This is better! Looking up close with a magnifying glass before I steam, I can actually see empty pores where the black heads just fell out. SQUEE! Best of all, I'm meeting my preferred ideal of not putting anything on my skin that I wouldn't put in my mouth! Skin is an organ too and it absorbs everything we put on it. Think about it: how else do those nicotine patches things work?
I also just started using a vinegar toner around my hairline, nose, chine and neck this week. Well, yesterday. The only drawback to this method has been two odd patches of acne forming on my neck under my chin in an area I've never had acne before. When it dawned on me that I probably wasn't cleaning the oil off this area well enough to prevent clogging the pores on my neck, I started using a vinegar toner/rinse/spritz. I soaked a strip of lemon peel in a 1/4 cup of vinegar for a week, then diluted it with 2 cups of peppermint tea. Rubbing this over my face right after I steam seems to be doing the trick as that weird acne patch is starting to clear after only one use. The lemon-mint vinegar toner is wonderful for summer and smells really nice as you rub it one. I think I may try this trick again for winter, but with a vanilla bean pod instead. Less astringent for the colder months, you know?
If you can get past the weird factor of rubbing oil onto your skin, I really encourage you to try this out! I've been pleasantly surprised to even find a few sun/age spots have started to fade during the last month I've been using OCM. I'm hoping the lemon in my toner will help take them all the way to gone! :) It's all natural (as in you could drink it while no bad effects), it feels luxurious massaging it in every night, takes the place of face wash AND moisturizers, plus my skin really likes it! And did I mention it's SO much less expensive than store bought? Homemade is better!
Chicken Basics: Oriental Stir-Fry
Oriental Stir-Fry Recipe
Ingredients:
Ingredients:
- Leftover chicken and rice, from Chicken Basics recipe
- Fresh or frozen Broccoli, 1 cup (you can also use an asian vegetable medly, but I like just plain broccoli)
- 1 tbsp Soy sauce
- 2 tbsp chopped garlic
- 1tbsp chopped ginger (again, from a jar is fine here)
- 1 tbsp olive oil
- Pull out the leftover chicken and rice.
- Pull out chicken to slice and place rice on plate.
- Warm rice in mircowave.
- Place frying pan or wok on stove over high heat and add 1tbsp olive oil.
- Slice the chicken breast into strips and add to pan.
- Add in fresh or frozen broccoli, soy sauce, garlic and ginger.
- Saute over high heat, stirring constantly until broccoli is cooked to desired tenderness. Usually about five minutes, or so.
- Pull out warm rice from mircowave, pour chicken and broccoli over the top and eat!
Monday, June 21, 2010
It's one of those weeks...
You know what I mean? One of those weeks where everything goes wrong, the simplest things take six tries to complete and everyone yells about everything?
Yesterday was stressful. I work in retail sales and yesterday three of our seven scheduled team members didn't show up. Half staff. To top it off, we're changing over to start our twice annual sale and LOTS of merchandise had to move around at closing, all the signs in the store had to be changed and we still had the basic daily work and customers to help. We blitzed through it with a dogged we-will-get-it-done-and-tomorrow-will-be-better.
Tomorrow became today...and it wasn't better.
Two things sum up today: being summoned to abandon the customer I was with to go help another customer across the store. Okay, this happens. We're all specialists in different areas and maybe it was too hard a question? So sure, off I went. But when I got there and found seven (SEVEN!) managers standing twenty feet from the poor waiting customers I was appalled. WHY any of the seven managers and three co-workers twenty feet away couldn't help while I was trying to get there, I just don't know!! I felt so bad for the very nice people who'd been waiting more than fifteen minutes at this point! ANY of those seven managers could have looked up two names from a tag and sent them on their way at any point in time before my arrival...but they didn't. They could have read the tag and called us and we could have booked the unit and sent it down to that printer for them...but they didn't do that either.
Then later that day, one of those self-same managers listed above responded to my quick yes-or-no question with a curt, "I'm off the clock" and a closed door in my face. ?!? But I just saw you clock IN from lunch! Huh? She called me later to ask again what my question had been and did go so far as to admit, "[she] should have spoken differently." I'LL SAY!! H-E-double-hockey-sticks! I was on a legitimate break when I asked the question to begin with! "I'm off the clock" Off your rocker, maybe lady! Try saying, I'll get back to you, Hang on, try me later, let me check. Any of these wouldn't have left me furious. Cause I am. I'll never respect her again, as she has so little respect for me. And that makes me both sad and angry. It's hard to work for people you don't respect. And right now I don't have a lot of respect for any of those seven managers.
So what do I do now? Swallow and move on? Scream and try again tomorrow? How do you deal with this stuff?
Chicken Basics: Cilantro-Lime Chicken
Cilantro-Lime Chicken Recipe

Ingredients:
- Leftover chicken and rice, from Chicken Basics recipe
- 2tbsp butter (or olive oil if you're worried about cholesterol)
- 1/3 cup black beans (those ones in the freezer? Yeah, pull 'em out!)
- Either 2-3 limes to juice or one bottle of lime juice
- 2 tsp chopped cilantro (fresh or frozen--NOT dried)
- sugar to taste (different people like different levels of bite from the lime juice...and not all limes are equally sweet, so taste the sauce as you go and add sugar if it needs it)
- fresh tomato and/or avocado
- If beans are frozen, pop into microwave to thaw.
- In a glass measuring cup, combine 2 tsp butter (or olive oil) with 1/4 lime juice and 2 cubes of frozen cilantro.
- Mix beans with rice on plate.
- Melt sauce in microwave, stirring upon removal until somewhat incorporated
- Pour over cold chicken and rice. Try to pour a little at a time to cover every bite with yumminess!
- Warm sauce covered chicken and rice while you slice a tomato and/or avocado for sides.


Sadly, today I didn't have any avocado to add to the picture. I ate it all in guacamole last night!
Sunday, June 20, 2010
Chicken Basics: Mexican Chicken!
Mexican Chicken Recipe
Ingredients:


Ingredients:

- Leftover chicken and rice, from Chicken Basics recipe
- 1 can black beans*
- 1/4 cup frozen corn*
- 1/2 cup your favorite salsa
- Sprinkling of shredded cheese (Mexican blend or Cheddar work best)
- Open and drain a can of black beans. Divide into quarters and freeze the extra three servings. This is where those tiny 2 oz. Gladware containers come in handy!
- Mix the first quarter with your favorite salsa, corn and rice.
- Add a tablespoon or two of salsa, to your desired level of heat, and mix. Place beans and rice onto plate and add chicken.
- Spoon salsa over the chicken breast and top with shredded Mexican cheese.
- Warm in microwave until cheese melts and enjoy!


HINT-- try keeping your shredded cheese in the freezer! It stays good for months there, rather than weeks in the fridge. So if that block of cheese in the fridge is looking a little sad, shred it up! Why let it go bad when you can freeze it instead? Saves time and money! Just like IQF chicken breasts, cheese happily thaws while it melts...no need to wait.
Saturday, June 19, 2010
Chicken Basics: With Garlic Green Beans
Day one is really, really easy. You're going to eat chicken and rice with green beans on the side. Add in a side salad-from-a-bag and you have 2-3 veggie servings (depending on how much salad you eat!), one good carb and one lean protein for less than 8 minutes in the kitchen. I can do it in five, but I figured you might need time to double check the recipe, which would take an extra minute or two!
Garlic Green Beans
Ingredients:


Garlic Green Beans
Ingredients:

- Frozen green beans (I buy mine from Trader Joe's. A big bag is $2 and I've yet to find better green beans...not even fresh taste as good!)
- Chopped garlic (from a jar is fine, but you can dice a clove if you prefer)
- 1 tsp olive oil
- Salt and pepper to taste
- Place a small non-stick pan over medium-high heat. An omelet pan is good, if you're making one serving.
- Dribble a teaspoon of olive oil into the pan and let it heat a bit
- Place chicken and rice onto plate and microwave until warm.
- Toss in some green beans, about a cup of frozen beans per person.
- Add a teaspoon to a tablespoon of fresh chopped garlic-from a jar is fine here! One teaspoon for light garlic flavor, a tablespoon for heavy garlic flavor...that;s yours, Mike!
- Saute, stirring often until beans are soft and the end of a bean or two show a hint of brown.
- Add to your plate off microwaved chicken and rice and eat.


That's it! A yummy side dish ready to go. You can also try adding bacon to it, if you're feeling naughty!
Friday, June 18, 2010
Chicken Basics Starter Recipe
This next series of posts is being written primarily for my friend Mike, though anyone who's cooking meals for one will find them useful. We've been friends since our freshman year of college, but he lives a few hours away so we don't get to see each other as often as we'd like. On a rare visit last Saturday, he was complaining about how hard it is to eat well when you're only cooking for one. I was really surprised that after almost fifteen years of friendship, I'd never shown him my easy method for making a basic recipe and changing it up every night to make a new taste sensation! Now that I'm married, this isn't much of an issue anymore (my husband Scott can eat), but I spent many years doing this as a single person. Once you have a basic dish, it's easy to change seasonings without having to cook a completely new meal from scratch every night after work. Especially- when-all-you-want-to-do-is-collapse-and-watch-TV. This method cuts down on dishes, but still means you can choose your desired meal every night while eating well and cheaply! Which is even more important in today's economy than it was when I did it all those years ago.
Today's post is a how-to for the basic chicken recipe. Then every day this week I'll post a new mix-up for the basic recipe. When I was single, I'd make Chicken and Rice Basics once a week, then make up a Basic Ground Beef Recipe while the Chicken Basics cooked in the oven. I'll post the Ground Beef Starter Recipe once I've finished with the Chicken Basics variations. By mixing and matching, you can eat a week of dinners alternating the chicken and beef Basics...without ever realizing you're eating leftovers!
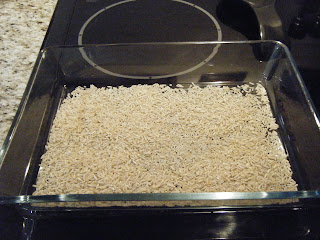
Chicken and Rice Basics Recipe
Ingredients:
1. In a 9x13 baking dish, spread rice evenly into bottom of pan.


Today's post is a how-to for the basic chicken recipe. Then every day this week I'll post a new mix-up for the basic recipe. When I was single, I'd make Chicken and Rice Basics once a week, then make up a Basic Ground Beef Recipe while the Chicken Basics cooked in the oven. I'll post the Ground Beef Starter Recipe once I've finished with the Chicken Basics variations. By mixing and matching, you can eat a week of dinners alternating the chicken and beef Basics...without ever realizing you're eating leftovers!
Chicken and Rice Basics Recipe
Ingredients:
- 1 lb chicken breast, boneless and skinless (four pieces if using IQF* chicken breasts)
- 1 cup brown rice (it's better for you and tastes good cooked in broth! no cardboard here, I promise! )
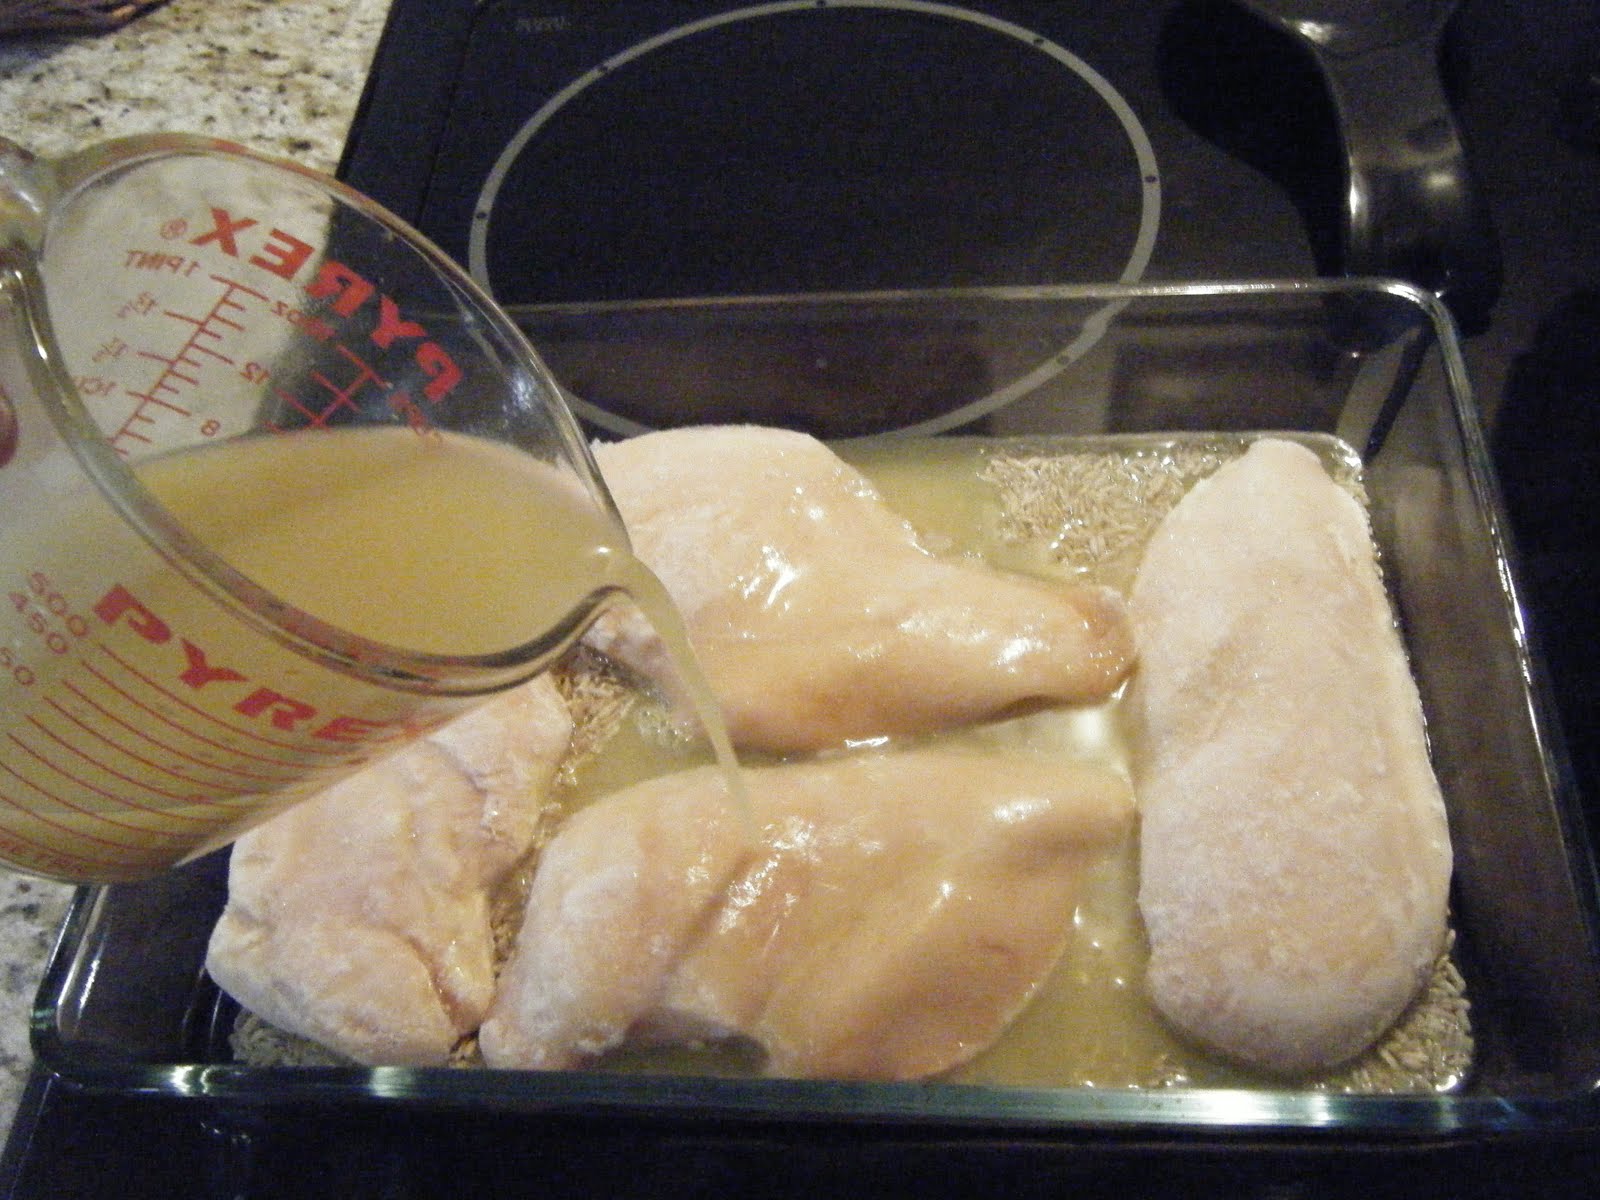
- 2 cans chicken broth, or 2 cups water and bouillon (I use Better Than Bouillon concentrate)
- salt, pepper, granulated or fresh garlic
1. In a 9x13 baking dish, spread rice evenly into bottom of pan.

2. Evenly space chicken breasts on top of rice. (Yes, my chicken is still frozen. So what? It thaws while it cooks in the oven.)


4. Add salt and pepper before covering pan with aluminum foil and bake 1 hour at 350 or until rice absorbs all liquid. 
3. If using fresh garlic, chop into fine pieces and mix into chicken broth before pouring broth over the rice. If using granulated garlic, sprinkle over top of chicken breasts to taste.

5. When no liquid remains in bottom of pan, remove foil to brown breasts and bake 5-10 minutes more.

6. Set aside to cool. Once cool, separate chicken and rice evenly into 4 containers.
I use Gladware entree sized containers; they're just the right size for a one person meal. Freeze whatever you won’t use in the next week or so. Safe storage times in fridge will vary from fridge to fridge and climate to climate. If you're in doubt, freeze it. Just toss it in the fridge before you leave in the morning to it can thaw out and be ready for dinner that night.
Check back tomorrow for the perfect veggie side dish to go with chicken and rice: Garlic Green Beans!
Friday, June 4, 2010
The Battle of the Grungy Grout

So, many of you may remember where we left off yesterday. The excess grout left all over the tiles during installation had been removed with a putty knife and the Mr Clean Magic Eraser. However, the grout lines themselves were still the same icky-nasty-dirty mess.
That's it, hanging out on the right over there. Say it again, EWW! For the record, much of this isn't even our dirt! It was worse when we first moved in two years ago.
Choices of weapons in this war? Baking soda or the smelly, burn-your-hands off chemical spray. I did buy one to use as a more scientific experiement, but I nearly choked when I opened the bottle! The fumes were awful. I couldn't stand it, not even to try it out so I broke out the baking soda and went to town. Very low tech, I dumped a couple big scoops into a shallow bowl and filled it up with hot water to make a kind of slurry. It was wetter than a paste, but not a liquid by any means. I grabbed a scrub brush, scooped some baking soda from the bottom of the bowl onto it and tapped it onto the grout lines. It kinda slid off the brush and puddled in between the tiles. I let it sit and soak in for ten minutes or so before giving it a couple quick back-and-forth swipes with the scrub brush and rinsing the baking soda off with a rag. the results? AMAZING! See for yourself below.

I KNOW! I can't believe it's the same floor from when we started; it looks almost brand new. When my husband got home that night, he thought I'd regrouted the floor. Seriously! It was THAT clean! From baking soda, a bit of water and a few quick swipes with a scrub brush. Hmm, wonder how clean it would've gotten if I'd thought to do the final rinse with vinegar? Something to try next time! Like next week on the bathroom grout...
PS-Just a side note, the baking soda completely cleans it, but can't lay down a layer of protection against future dirt so once I let it dry out completely I gave it a good sealing with a paint on grout sealant to prevent a return to its previous state of ick. Thus far the sealant is working and we are still enjoying spakling clean grout several months later!
Thursday, June 3, 2010
Who says natural cleaning products don't work?
I certainly don't anymore! We had some seriously nasty tile in our kitchen. Well, the tile was great, but the grout hadn't been cleaned off well and was stuck to the tiles so they always looked dirty. And since that self same grout was never sealed properly, it was FILTHY. All the time, no matter how I tried to clean it. I mean, see for yourself:
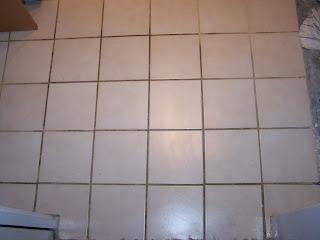 Ok, now- as a chorus: "EWWW."
So, as part of our recent kitchen remodel, I took advantage of the lack of kitchen cabinets (well, lack of anything really..even walls!) and decided to really deep clean this area. Since there was no need to be in the kitchen as it wasn't like we had FOOD there so now was the time if I had to use a nasty chemical to strip the dirt out of the grout. I figured I could seal the area off, stick a fan aimed at the vent hole and shut it up until the fumes were gone if I had to. But I didn't want to. I mean, chemicals can be seriously nasty stuff. I was a college chemistry minor; I know! So after a lot of googling, I came down to two options for removal of the excess grout and dirt:
Then I got stumped, trying to figure out how to get the last bits of it out of the tiles' texture. See, floor tile has a texture to it to keep you from slipping on it and mine, well, it looked like my thighs. Seriously, the only way to describe the texture of these is that it looks like cellulite. Hence, it looks like my thighs. sigh So while I'm sitting there, stumped on how to get to the 100% clean I so desperately desire, I decide to remove the heel marks I've left all over the tile before moving on. Enter the Mr. Clean Magic Eraser. Just for the heck of it, I swiped it over the remaining grout stuck in the cellulite dimples. (On the tile, people, not on me!) And it came off. That nasty excess grout that always made my floor look dirty was GONE. Completely. Now I'm grinning ear to ear and madly wiping the little bits up and generally acting like a crazy person...because the grout on the tiles is gone!! I'm sad to say, when I stood up and looked at the kitchen floor once I'd removed all that nastiness, I did a happy caroling dance of pure joy that woke my poor hubby out of a sound sleep. It was 2am, after all. I just hope I didn't wake the neighbors, too!
Moral of the story: do not believe you need chemicals to tackle a dirty job. Start simple, start easy, start safe. Try it. And then be joyful when it works....unless it's 2am, of course!
Part two of the experiment tomorrow: the grungy grout lines!

So, as part of our recent kitchen remodel, I took advantage of the lack of kitchen cabinets (well, lack of anything really..even walls!) and decided to really deep clean this area. Since there was no need to be in the kitchen as it wasn't like we had FOOD there so now was the time if I had to use a nasty chemical to strip the dirt out of the grout. I figured I could seal the area off, stick a fan aimed at the vent hole and shut it up until the fumes were gone if I had to. But I didn't want to. I mean, chemicals can be seriously nasty stuff. I was a college chemistry minor; I know! So after a lot of googling, I came down to two options for removal of the excess grout and dirt:
- Use muratic acid to remove the excess grout and heavy duty grout cleaner for the dirt in the grout. I knew it would work, but muratic acid is heavy duty stuff I didn't really want to go near, let alone spending several hours crawling around in.
- Use baking soda and a putty knife for the excess grout. This might or might not work, but I figured it couldn't hurt anything, so why not at least try it?
Then I got stumped, trying to figure out how to get the last bits of it out of the tiles' texture. See, floor tile has a texture to it to keep you from slipping on it and mine, well, it looked like my thighs. Seriously, the only way to describe the texture of these is that it looks like cellulite. Hence, it looks like my thighs. sigh So while I'm sitting there, stumped on how to get to the 100% clean I so desperately desire, I decide to remove the heel marks I've left all over the tile before moving on. Enter the Mr. Clean Magic Eraser. Just for the heck of it, I swiped it over the remaining grout stuck in the cellulite dimples. (On the tile, people, not on me!) And it came off. That nasty excess grout that always made my floor look dirty was GONE. Completely. Now I'm grinning ear to ear and madly wiping the little bits up and generally acting like a crazy person...because the grout on the tiles is gone!! I'm sad to say, when I stood up and looked at the kitchen floor once I'd removed all that nastiness, I did a happy caroling dance of pure joy that woke my poor hubby out of a sound sleep. It was 2am, after all. I just hope I didn't wake the neighbors, too!
Moral of the story: do not believe you need chemicals to tackle a dirty job. Start simple, start easy, start safe. Try it. And then be joyful when it works....unless it's 2am, of course!
Part two of the experiment tomorrow: the grungy grout lines!
Subscribe to:
Posts (Atom)
